728x90
1 Custom Cell
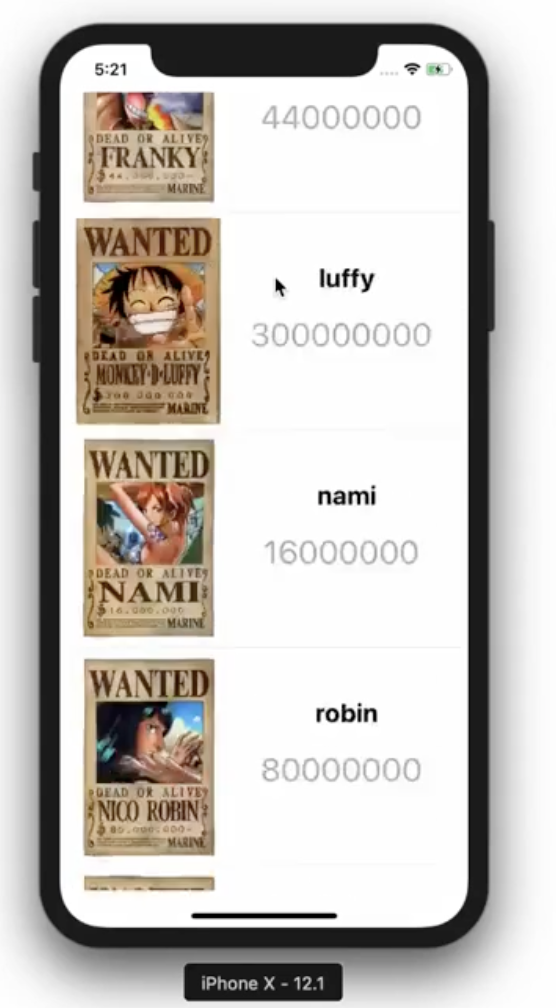
- TableViewCell을 상속받아서 아래 그림처럼 나만의 셀을 정의해보자
- 이전 포스트에 이어서 작업을 진행한다.

- 가장먼저 커스텀 셀 class를 정의한다.
- UITableViewCell을 상속하며 한개의 이미지와 두개의 레이블을 갖는다.
class ListCell: UITableViewCell {
    @IBOutlet weak var imgView: UIImageView!
    @IBOutlet weak var nameLabel: UILabel!
    @IBOutlet weak var bountyLabel: UILabel!
}
- 셀클릭 -> identity inspector -> custom class에 ListCell 연결


2 Cell 크기 조절
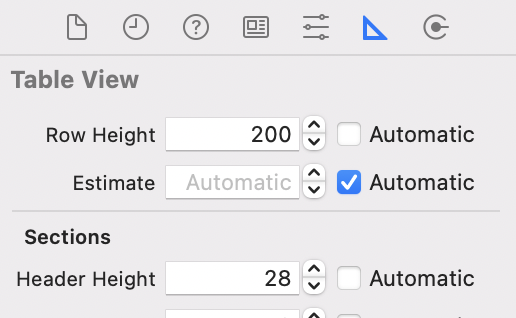
- 셀의 크기를 조정할 수 있다.


- table View에서도 셀의 크기를 조정해주자.


3 cell에 컴포넌트 넣기
- 이래처럼 이미지와 레이블을 넣고 class의 property들과 연결시킨다.
- cell과 outlet이 잘 연결되었는지 connection inspector에서 확인한다.


- 추가로 image View와 label에 입맛에 맞게 여러 contraints를 적용시켜보자.

- control키를 누른채로 imageview에서 imageview로 마우스를 드래그한다.
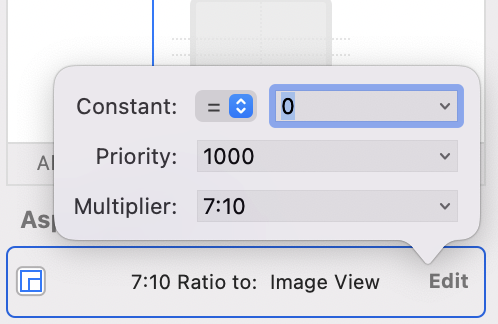
- aspect ratio를 적용하고 비율을 7대 10으로 맞춰보자.

4 리스트에 들어갈 데이터 준비
- 배열로 데이터를 정의한다.
import UIKit

class BountyViewController: UIViewController, UITableViewDataSource, UITableViewDelegate {

    let nameList = ["brook", "chopper", "franky", "luffy", "nami", "robin", "sanji", "zoro"]
    let bountyList = [33000000, 50, 44000000, 300000000, 16000000, 80000000, 77000000, 120000000]

    .....
    .....
    .....

}

class ListCell: UITableViewCell {
    @IBOutlet weak var imgView: UIImageView!
    @IBOutlet weak var nameLabel: UILabel!
    @IBOutlet weak var bountyLabel: UILabel!

}
- 필요한 이미지를 Assets.xcassets에 넣는다.

5 프로토콜 손보기
 func tableView(_ tableView: UITableView, numberOfRowsInSection section: Int) -> Int {
        return nameList.count
 }
- 배열의 원소 수만큼 셀을 그릴 것이다.
    func tableView(_ tableView: UITableView, cellForRowAt indexPath: IndexPath) -> UITableViewCell {
        guard let cell = tableView.dequeueReusableCell(withIdentifier: "cell", for: indexPath) as? ListCell else {
            return UITableViewCell()
        }
        let img = UIImage(named: "\(nameList[indexPath.row]).jpg")
        cell.imgView.image = img
        cell.nameLabel.text = nameList[indexPath.row]
        cell.bountyLabel.text = "\(bountyList[indexPath.row])"
        return cell
    }
- cell을 ListCell 타입으로 안전하게 casting하고
- ListCell과 outlet으로 연결한 컴포넌트들의 값을 채워 준다.
- Bounty View Controller의 전체 코드 및 결과는 다음과 같다.
import Foundation
import UIKit

class BountyViewController: UIViewController, UITableViewDataSource, UITableViewDelegate {

    let nameList = ["brook", "chopper", "franky", "luffy", "nami", "robin", "sanji", "zoro"]
    let bountyList = [33000000, 50, 44000000, 300000000, 16000000, 80000000, 77000000, 120000000]


    func tableView(_ tableView: UITableView, numberOfRowsInSection section: Int) -> Int {
        return nameList.count
    }

    func tableView(_ tableView: UITableView, cellForRowAt indexPath: IndexPath) -> UITableViewCell {
        guard let cell = tableView.dequeueReusableCell(withIdentifier: "cell", for: indexPath) as? ListCell else {
            return UITableViewCell()
        }
        let img = UIImage(named: "\(nameList[indexPath.row]).jpg")
        cell.imgView.image = img
        cell.nameLabel.text = nameList[indexPath.row]
        cell.bountyLabel.text = "\(bountyList[indexPath.row])"
        return cell
    }

    func tableView(_ tableView: UITableView, didSelectRowAt indexPath: IndexPath) {
        print("---->  \(indexPath.row)")
    }

    override func viewDidLoad() {
        super.viewDidLoad()
        // Do any additional setup after loading the view.
    }

}

class ListCell: UITableViewCell {
    @IBOutlet weak var imgView: UIImageView!
    @IBOutlet weak var nameLabel: UILabel!
    @IBOutlet weak var bountyLabel: UILabel!
}
728x90
반응형
'ComputerScience > ios App(Storyboard)' 카테고리의 다른 글
| ios - 15 Design Pattern (0) | 2021.08.02 |
|---|---|
| ios - 14 Segue (0) | 2021.07.28 |
| ios - 12 Table View, Table View Cell (0) | 2021.07.25 |
| ios - 11 swift 기본문법(Class) (0) | 2021.07.25 |
| ios - 10 swift 기본문법(Structure) (0) | 2021.07.22 |


