더북(TheBook): Node.js 교과서 개정 2판
thebook.io
* 위 내용을 정리하였음
1. SQL 데이터 베이스 세팅
- MySQL과 시퀄라이즈를 사용한다.
// models/user.js

const Sequelize = require('sequelize');

module.exports = class User extends Sequelize.Model {
  static init(sequelize) {
    return super.init({
      email: {
        type: Sequelize.STRING(40),
        allowNull: true,
        unique: true,
      },
      nick: {
        type: Sequelize.STRING(15),
        allowNull: false,
      },
      password: {
        type: Sequelize.STRING(100),
        allowNull: true,
      },
      provider: {
        type: Sequelize.STRING(10),
        allowNull: false,
        defaultValue: 'local',
      },
      snsId: {
        type: Sequelize.STRING(30),
        allowNull: true,
      },
    }, {
      sequelize,
      timestamps: true,
      underscored: false,
      modelName: 'User',
      tableName: 'users',
      paranoid: true,
      charset: 'utf8',
      collate: 'utf8_general_ci',
    });
  }

  static associate(db) {
    db.User.hasMany(db.Post);
    db.User.belongsToMany(db.User, {
      foreignKey: 'followingId',
      as: 'Followers',
      through: 'Follow',
    });
    db.User.belongsToMany(db.User, {
      foreignKey: 'followerId',
      as: 'Followings',
      through: 'Follow',
    });
  }
};
- user.js : 사용자 정보를 위한 테이블
- provider는 기본이 local이다. 만약 카카오 로그인을 했다면 값은 kakao가 된다.
- timestamps 옵션이 true이기 때문에 createdAt, updatedAt 컬럼이 생성된다.
- paranoid 옵션이 true이기 때문에 deletedAt 컬럼이 생성된다.
- user테이블은 post테이블과 1대다 관계를 맺는다.
- 다 쪽에 userId 속성을 추가하면 된다.
- user테이블은 자기 자신과 팔로우 팔로잉 관계를 맺을 수 있다. 이는 자기 자신과의 N:M관계이다.
- 1대다 관계와 달리 N:M 은 관계를 독립된 테이블로 만들어야 한다. (속성으로 집어넣을 수 없음)
- followingId, 외래키카 속성으로 새로운 테이블에 추가되기 때문에 belongsToMany를 호출한다.
- UserUser가 테이블(모델) 이름이 되면 안되기 때문에 through를 사용해 Follow라는 이름을 붙인다.
- 자신과의 N:M관계는 반드시 as 옵션을 사용해야 한다.
- Followings(User)는 Follow테이블의 followerId를보고 Followers(User) 테이블을 참조한다.
- Followers(User)는 Follow테이블의 followingId를보고 Following(User) 테이블을 참조한다.
- 이렇게 as를 사용해서 관계를 지정했기 때문에 getFollowings 같은 관계 메서드를 지원한다.

// models/post.js

const Sequelize = require('sequelize');

module.exports = class Post extends Sequelize.Model {
  static init(sequelize) {
    return super.init({
      content: {
        type: Sequelize.STRING(140),
        allowNull: false,
      },
      img: {
        type: Sequelize.STRING(200),
        allowNull: true,
      },
    }, {
      sequelize,
      timestamps: true,
      underscored: false,
      modelName: 'Post',
      tableName: 'posts',
      paranoid: false,
      charset: 'utf8mb4',
      collate: 'utf8mb4_general_ci',
    });
  }

  static associate(db) {
    db.Post.belongsTo(db.User);
    db.Post.belongsToMany(db.Hashtag, { through: 'PostHashtag' });
  }
};
- post.js : 게시물 테이블
- 1대다 관계이므로 작성자 UserId 컬럼이 포스트 테이블에 생성되야 한다. 따라서 belongsTo로 연결한다.
- 이제 post.getUser, post.addUser 메서드를 사용할 수 있다.
- 해시태그 테이블과의 관계는 N:M이다.
- 다대다 관계기 때문에 중간 테이블이 필요하고 그 이름은 PostHashtag이다.
- PostHashtag를 통해서 Hashtag를 참조한다.
// models/hashtag.js

const Sequelize = require('sequelize');

module.exports = class Hashtag extends Sequelize.Model {
  static init(sequelize) {
    return super.init({
      title: {
        type: Sequelize.STRING(15),
        allowNull: false,
        unique: true,
      },
    }, {
      sequelize,
      timestamps: true,
      underscored: false,
      modelName: 'Hashtag',
      tableName: 'hashtags',
      paranoid: false,
      charset: 'utf8mb4',
      collate: 'utf8mb4_general_ci',
    });
  }

  static associate(db) {
    db.Hashtag.belongsToMany(db.Post, { through: 'PostHashtag' });
  }
};
- hashtag.js : 해시태그 테이블
- 해시태그 이름만 저장되어 있다.
- 해시태그를 통해 해당 태그의 게시물들을 조회할 수 있을 것이다.
- 따라서 Post테이블과 N:M관계이다.
// models/index.js

const Sequelize = require('sequelize');
const env = process.env.NODE_ENV || 'development';
const config = require('../config/config')[env];
const User = require('./user');
const Post = require('./post');
const Hashtag = require('./hashtag');

const db = {};
const sequelize = new Sequelize(
  config.database, config.username, config.password, config,
);

db.sequelize = sequelize;
db.User = User;
db.Post = Post;
db.Hashtag = Hashtag;

User.init(sequelize);
Post.init(sequelize);
Hashtag.init(sequelize);

User.associate(db);
Post.associate(db);
Hashtag.associate(db);

module.exports = db;
- 자동으로 생성된 Index.js를 바꾸어주자.
- config로 데이터베이스 설정을 불러온다.
- new Sequelize로 MySQL과 연결할 객체들을 생성하고 이 sequelize객체는 나중에 계속 사용하기 때문에 db에 저장한다.
- db에 User, Post, Hashtag 테이블들을 가리키도록 하고(저장)
- init 멤버 메서드를 호출해서 실제 모델을 생성한다.
- associate 멤버 메서드를 호출해서 연결 관계를 만들어준다.
- 즉 이렇게 총 User, Hashtag, Post, PostHashtag, Follow 테이블(모델)들이 생성되었다.
- 아래 처럼 모두 접근 가능하다.
db.sequelize.models.PostHashtag
2. 데이터베이스 생성 및 연결
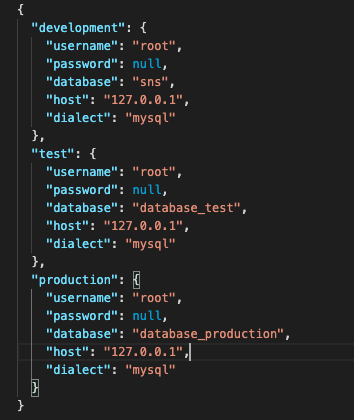
- 아직은 데이터베이스를 만들지 않았다. 시퀄라이즈의 config.json을 읽어서 자동으로 데이터베이스를 생성하자.
- config.json을 채워준다.

npx sequelize db:create
- 데이터 베이스가 생성되었으니 시퀄라이즈 모델들을 app.js서버와 연결하자.
sequelize.sync({ force: false })
  .then(() => {
    console.log('데이터 베이스 연결 성공');
  })
  .catch((err) => {
    console.error(err);
  });
- 아래는 전체 app.js이다.
const express = require('express');
const cookieParser = require('cookie-parser');
const morgan = require('morgan');
const path = require('path');
const session = require('express-session');
const nunjucks = require('nunjucks');
const dotenv = require('dotenv');

dotenv.config();
const pageRouter = require('./routes/page');
const { sequelize } = require('./models');

const app = express();
app.set('port', process.env.PORT || 8001);
app.set('view engine', 'html');
nunjucks.configure('views', {
  express: app,
  watch: true,
});

sequelize.sync({ force: false })
  .then(() => {
    console.log('데이터 베이스 연결 성공');
  })
  .catch((err) => {
    console.error(err);
  });

app.use(morgan('dev'));
app.use(express.static(path.join(__dirname, 'public')));
app.use(express.json());
app.use(express.urlencoded({ extended: false }));
app.use(cookieParser(process.env.COOKIE_SECRET));
app.use(session({
  resave: false,
  saveUninitialized: false,
  secret: process.env.COOKIE_SECRET,
  cookie: {
    httpOnly: true,
    secure: false,
  },
}));

app.use('/', pageRouter);

app.use((req, res, next) => {
  const error =  new Error(`${req.method} ${req.url} 라우터가 없습니다.`);
  error.status = 404;
  next(error);
});

app.use((err, req, res, next) => {
  res.locals.message = err.message;
  res.locals.error = process.env.NODE_ENV !== 'production' ? err : {};
  res.status(err.status || 500);
  res.render('error');
});

app.listen(app.get('port'), () => {
  console.log(app.get('port'), '번 포트에서 대기중');
});'ComputerScience > NodeJs' 카테고리의 다른 글
| node - 9.4 익스프레스로 SNS서비스 만들기 (이미지 업로드, 팔로잉, 해시태그 구현) (0) | 2022.02.07 |
|---|---|
| node - 9.3 익스프레스로 SNS 서비스 만들기(로그인 구현) (0) | 2022.02.06 |
| node - 9.1 익스프레스로 SNS 서비스 만들기(프로젝트 구조) (0) | 2022.02.05 |
| node - 8 몽고디비 (0) | 2022.02.03 |
| node - 7.6 시퀄라이즈 사용하기 (0) | 2022.01.31 |


